If you're not familiar with Instagram, it's a photo-sharing network that can be downloaded to your smart phone as an application. Think of it as Facebook without the status updates. By developing a simple service that does one thing, and does it well, Instagram has become one of the most prominent photo sharing apps on the market.
The great thing about using Instagram is that it's not just for individuals. Businesses and non-profits alike can take advantage of this service to share their day and passions with their dedicated customers and fans. These fans number nearly 200 million active users a month, and approximately 7.3 million new daily posts. That's an astonishing number of potential new customers available for you to capture.
By adding Instagram on Blogger as a widget, you can unleash a new visual aspect of that site and allow visitors to go beyond just words on a page. With the convenience to carry the application around on your smartphone wherever you go, you can snap pictures, apply filters, and upload that content to your profile. From the profile, a widget specially designed for Instagram on Blogger would translate that data and display the image on your site. Even those visitors that aren't members of Instagram could benefit from such a service.
It doesn't matter what you are sharing. Whether you're the type of person that loves to share pictures of your dinner with the world, or business owner that loves showcasing their brand in everyday life, Instagram can work for you. Adding Instagram on Blogger as a widget also offers an incredibly accessible tool for stock photos to use in new posts.
This guide will explain how to add an Instagram widget to your site with step-by-step instructions. The design of your new Instagram widget is entirely customizable and will allow you to modify the background color, font, and how the widget is actually displayed on the site. When you're finished, you'll find that the Instagram widget will blend together effortlessly with your current theme and make your Blogger site truly stand out from the rest.
How to Add An Instagram Widget in Blogger
1. To get the Instagram widget, access the Intagme website here:
Intagme
2. Type in your username > select Grid or Slideshow:
 |
Instagram Widget For Blogger
|
3. Select the Thumbnail size of your images (100px is the default) and choose if you want a border around your Photos or not
 |
| Thumbnail Size and Photo Border |
4. To change the Background Color, simply click on the empty box and pick your favorite color
 |
| Background Color and Sharing Buttons |
5. If you want to show the Sharing buttons on your widget, select 'Yes', otherwise, click 'No'.
6. Once you're satisfied with the widget, press the "Get Code" button and copy your code.
 |
| Get Code |
7. Log into your
Blogger account and select your blog > navigate to Layout and click on the "Add a Gadget" link on the right side:
 |
| Add a Gadget |
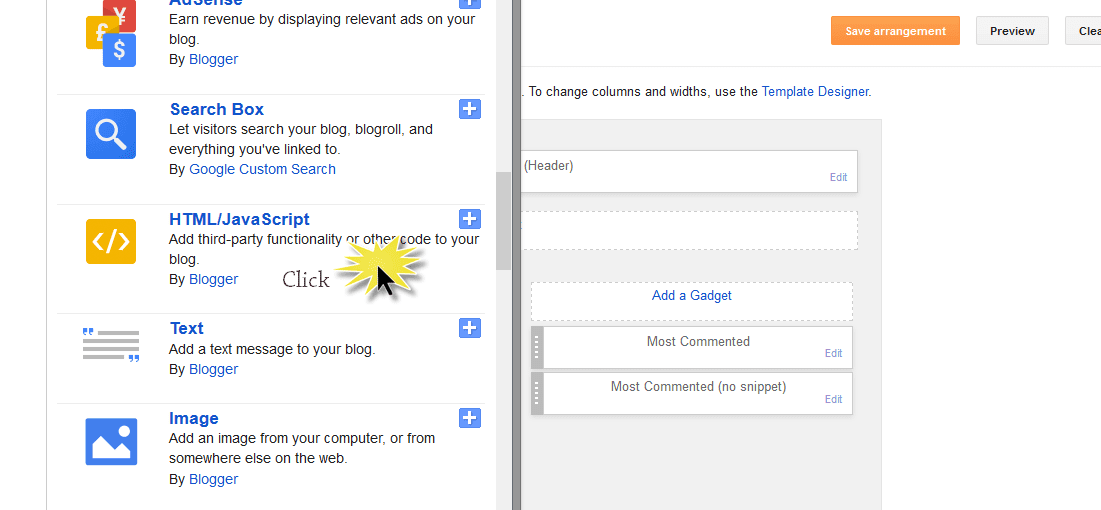
8. In the pop-up window, scroll down and click on the "HTML/JavaScript" gadget:
 |
| html/javascript |
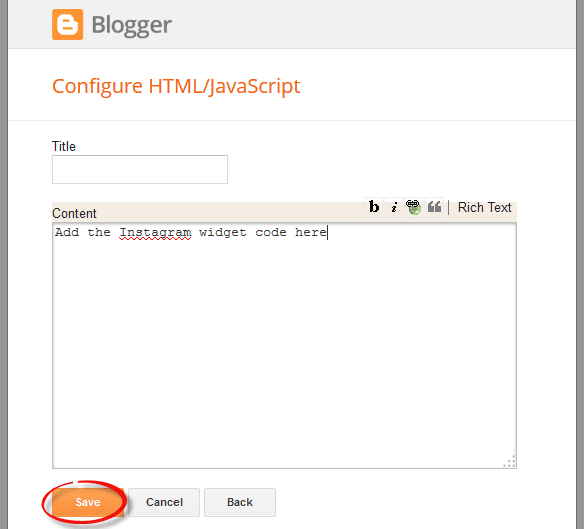
9. Paste the code that you got from the Instagme website into the content section and press the 'Save' button to save the widget.
 |
| Add Instagram Widget Code |
10. Click and drag your widget if you want to change its position and press the "Save Arrangement" button on the upper right side
 |
| Click and Drag |
And that's it! Now you have your very own Instagram widget on your Blogger blog to share new photos with visitors, and provide just a glimpse of your life when you're away from the computer. To change or add any of the photos that are displayed in the widget, you'll have to go directly through the app itself, or log on to your account via Instagram's website.
Once you're ready to show off your new work, let all your customers or fans know by posting a Facebook link to the site or a tweet about the changes and asking them to follow you. Just make sure that you've added a few photos before making the announcement, so that they have something to look at. After they access your widget, they can like your new photos and interact with you in entirely new ways.


0 comments:
Post a Comment