Showing posts with label Widgets. Show all posts

Wednesday, August 8, 2018

Add a Verfied Badge on Blogger Author Comment Profile

Do you noticed a tick mark in some Facebook Pages like Actors, Political Leaders. Verified mark is only available for Worldwide stuff like big companies, Actors such have the chance to be faked. When we move mouse over that tick, it shows a “Verified Page” message. Do you wish to add that verified tick mark to  your (Author/Admin) comment in your blog.Here I am going to show you how to add Facebook verified Page mark to Admin comments.

SEE ALSO: Beautiful CSS Popup Email Subscription boX 2018 for Blogger
facebook verfied badge blogger author comment profile blogger widgets
Verified Badge
Sign In to Blogger Dashboard
Go to Template  -> Edit HTML

  • Find .comments .comments-content .icon.blog-author and delete the following code inside it

background-repeat: no-repeat;
background-image: url(data:image/png;base64,iVBORw0KGgoAAAANSUhEUgAAABIAAAASCAYAAABWzo5XAAAAAXNSR0IArs4c6QAAAAZiS0dEAP8A/wD/oL2nkwAAAAlwSFlzAAALEgAACxIB0t1+/AAAAAd0SU1FB9sLFwMeCjjhcOMAAAD+SURBVDjLtZSvTgNBEIe/WRRnm3U8RC1neQdsm1zSBIU9VVF1FkUguQQsD9ITmD7ECZIJSE4OZo9stoVjC/zc7ky+zH9hXwVwDpTAWWLrgS3QAe8AZgaAJI5zYAmc8r0G4AHYHQKVwII8PZrZFsBFkeRCABYiMh9BRUhnSkPTNCtVXYXURi1FpBDgArj8QU1eVXUzfnjv7yP7kwu1mYrkWlU33vs1QNu2qU8pwN0UpKoqokjWwCztrMuBhEhmh8bD5UDqur75asbcX0BGUB9/HAMB+r32hznJgXy2v0sGLBcyAJ1EK3LFcbo1s91JeLwAbwGYu7TP/3ZGfnXYPgAVNngtqatUNgAAAABJRU5ErkJggg==);


  • And copy the following code inside it


background: url(“https://dl.dropboxusercontent.com/s/gp8fhc34w2rka9h/verified%20page.png”) no-repeat scroll 0 0 transparent;


  • Final code looks like the following


.comments .comments-content .icon.blog-author {
    background: url(“https://dl.dropboxusercontent.com/s/gp8fhc34w2rka9h/verified%20page.png”) no-repeat scroll 0 0 transparent;
}

I hope this article will help you to customize your admin comment.

Saturday, August 4, 2018

Beautiful CSS Popup Email Subscription boX 2018 for Blogger

popup email subscription box new 2018 email subscription box blogger template blogger widgets wordpress plugins

Introduction

Yes, as the title suggests it is a PURELY CSSed Pop up email subscription box not only for Blogger but for almost all types of platform as long as you have access to feedburner. This widget is a combination of my previous post email subscription box and a simple and cool pop up widget built with CSS. Make sure to follow the steps to get it working!

SEE ALSO: Popup Email Subscription BoX For Blogger


HTML 

Go to Blogger » Template » Backup your Template » and Edit HTML

Add the following code before </body>

<div class='modalDialog' id='signup'>
<div><a class='close' href='#close' title='Close'><i class='fa fa-times'/></a>
<div class='signup-container'>
<div class='newsletter-sm'>
<i class='fa fa-envelope-o enve'/>
<h3>Subscribe to Newsletter</h3>
<p style='text-align:center'>Sign up with your email address to receive news and updates straight in your inbox.</p>
<form action='https://feedburner.google.com/fb/a/mailverify' method='post' onsubmit='window.open(&apos;https://feedburner.google.com/fb/a/mailverify?uri=Ecdlthemes&apos;, &apos;popupwindow&apos;, &apos;scrollbars=yes,width=550,height=520&apos;);return true' target='popupwindow'>
<div class='newsletter-sm-bot'>
<input class='newsletter-input-sm' name='email' placeholder='Enter Your Email' type='text'/>
<button class='newsletter-button-sm' type='submit'>Subscribe</button></div>
<input name='uri' type='hidden' value='Ecdlthemes'/>
</form></div></div></div></div>


For this widget to work you need to add a link that will serve as the button or handler for the popup.
Add the following code anywhere you want it to be displayed.
e.g. inside your nav menu

<a href='#signup'>Signup</a>


SEE ALSO: Stop Blogger from Redirecting Blogspot to Country Specific URLs

Popup Email Subscription boX 2018 for blogger
Popup Email Subscription boX 2018 for Blogger

CSS

Copy and paste the code before ]]></b:skin>


.enve{background:#e3cd16;color:#000;width:50px;height:50px;display:block!important;line-height:50px!important;text-align:center;font-size:24px!important;-webkit-border-radius:50px;-moz-border-radius:50px;border-radius:50px;margin:0 auto}.newsletter-sm{background:#fff url(https://s3.amazonaws.com/peoplepng/wp-content/uploads/2018/04/19082705/Colorful-Geometric-Backgrounds-PNG-888x1024.png);width:100%;margin:0;padding:20px;box-sizing: border-box;}.newsletter-sm h3,.newsletter-sm p{color:#000;font-family:"Maven Pro",sans-serif}.newsletter-sm h3{font-weight:400;text-align:center;margin-bottom:10px;font-size:24px}.newsletter-sm p{font-size:14px;line-height:20px}.newsletter-sm .newsletter-input-sm{border:0;box-sizing: border-box;padding:5px 10px;width:360px;float:left;height:40px;color:#000;border-radius:3px;-webkit-border-radius:3px;-moz-border-radius:3px}.newsletter-sm .newsletter-sm-bot{background:#e3cd16 url(https://s3.amazonaws.com/peoplepng/wp-content/uploads/2018/04/19082705/Colorful-Geometric-Backgrounds-PNG-888x1024.png) no-repeat;box-sizing: border-box;padding:20px;margin:0 -20px -20px;height:80px}.newsletter-sm .newsletter-button-sm{float:right;height:40px;display:inline-block;font-size:14px;box-sizing: border-box;padding:5px 10px;position:relative;color:#000;text-align:center;background:#d2bc00;border:1px solid #000;cursor:pointer;border-radius:3px;-webkit-border-radius:3px;-moz-border-radius:3px}.modalDialog{position:fixed;font-family:Arial,Helvetica,sans-serif;top:0;right:0;bottom:0;left:0;background:rgba(0,0,0,.6);z-index:99999;opacity:0;-webkit-transition:opacity 200ms ease-in;-moz-transition:opacity 200ms ease-in;transition:opacity 200ms ease-in;pointer-events:none}.modalDialog:target{opacity:1;pointer-events:auto}.modalDialog:target>div{margin:8% auto}.modalDialog>div{-webkit-transition:all 100ms ease-in;-moz-transition:all 100ms ease-in;transition:all 100ms ease-in;width:500px;position:relative;margin:5% auto;background:#000;min-height:200px}h2.signup{background:#e3cd16;border-bottom:1px solid #e3cd16;font-weight:400;text-align:center;box-sizing: border-box;padding:10px;color:#010101;font-size:18px}.close{color:#000;position:absolute;top:1px;right:1px;width:30px;height:30px;line-height:30px;text-align:center;font-size:16px}.close:hover{text-decoration:none;color:#BCCF00}

Save your Template

Final Words

Replace Ecdlthemes with your feedburner url.

Do some adjustments to fit your need.

Friday, August 3, 2018

Automatic Featured Posts Slider Widget For Blogger

Anyone with a blog wants readers to stay rather than move on to another. It's not being selfish but after someone has read one post, you'd definitely want them to read another, right? After all, isn't it one of the tenets of SEO to make people stay longer on your blog if it has to have a fighting chance at the rankings game?

The question now is: how exactly do you entice them to read a few more of your blog posts?


First off, you don't know exactly what brought a reader to your site. Well, you sort of do, if you have Google Analytics and all that. But that's beside the point. It wouldn't be productive for you to stare at GA the entire day hoping that it will tell you that yes, someone has been perusing your blog.


The point being driven at here is that you have to offer more on your blog. It's not enough that you get traffic from search engines and other sites; you also have to add some extras that will entice visitors to stay longer.


How exactly do you do that?

The Tactics of Persuading Users to Stay

Bloggers have employed a variety of tactics to persuade readers to stay. For one, they load the sidebar with widgets for Popular Posts, for example. Of course, it would be in the interest of your readers to know which other posts on your blog are gaining traction. Maybe those pieces are of interest to them as well. As a result, you've got one surefire way of making readers stay.


Now, what if you want to highlight Featured Posts, for example? Let's say that your blog has been around for a number of years and in that span, it has produced some great content that received quite the number of shares, likes, +1s, comments on so on. Wouldn't that be the kind of post you want featured? Unless your reader was looking for that topic specifically, there's little chance that they might uncover that gem if you don't bring it to their attention.


Thankfully, it's quite possible to add a Featured Posts slider for Blogger. And if you don't know how to make one yourself, this is exactly what this post is for. Here's an awesome Featured Posts slider widget that you can use on your blog.

DEMO

How to Add Featured Posts Slider Widget in Blogger

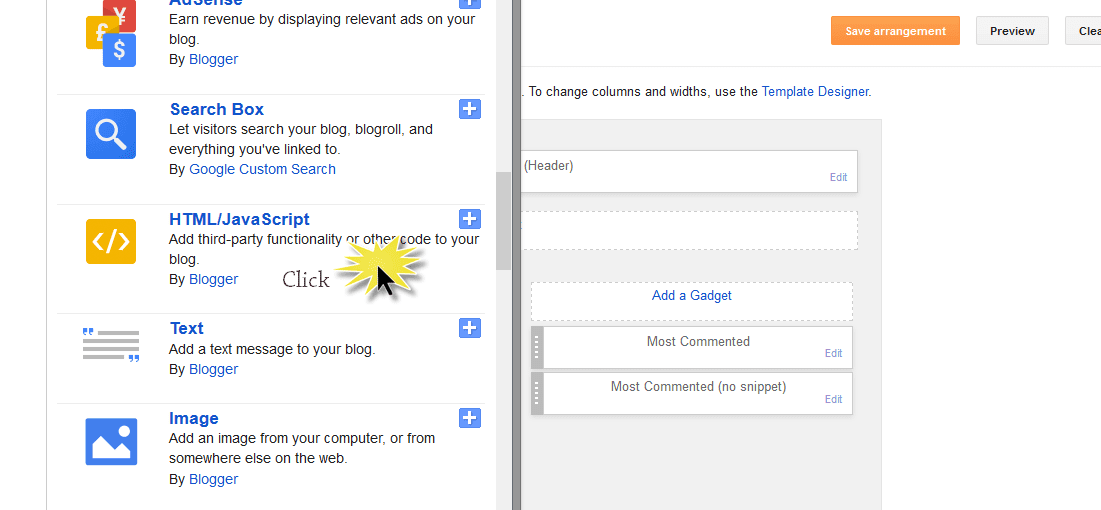
1. Go to 'Layout' > click the 'Add a gadget' link in the sidebar area and select 'HTML/JavaScript' gadget from the pop-up window.

2. Add the code below inside the empty box:

<style type="text/css">
ul.featured-widget-list,ul.featured-widget-list li{margin:0;padding:0;list-style:none;position:relative }ul.featured-widget-list li{display:none}ul.featured-widget-list li:nth-child(1){display:block;line-height:0}ul.featured-widget-list img{border:0;width:100%;height:auto}ul.featured-widget-list .featuredbg{width:100%;height:100%;position:absolute;z-index:2;left:0;top:0;opacity:.6;background-image:url(https://blogger.googleusercontent.com/img/b/R29vZ2xl/AVvXsEjJgkzWRgih8fji_IXnKzLMdZHj1oZ_DeYat4qW16-Xrpf3L72FkiuOOxa0JtElJMQCU9IdClvb8IKXheDzXUtdttuHKXQaoC58DcIDCTjNtt1ngQDAe-y7Lf2nXD96hDCtICNpr4sR5vk/s400/overlay-bg.png);background-position:0% 100%;background-repeat:repeat-x}ul.featured-widget-list .featuredbg:hover{opacity:.1}ul.featured-widget-list h5{position:absolute;left:0;right:0;text-align:center;bottom:10px;z-index:2;color:#fff;margin:0;text-transform: capitalize;padding:10px 20px;line-height:1.9em;letter-spacing:0.3px;font: 600 16px 'Abel', sans-serif;overflow:hidden}ul.featured-widget-list li:hover h5{bottom:30px}ul.featured-widget-list .featured-meta{font: 11px 'Abel', sans-serif;letter-spacing:0.3px;position:absolute;bottom:0;left:0;right:0;text-align:center;z-index:2;color:#fff;opacity:0}ul.featured-widget-list h5, ul.featured-widget-list .featured-meta {-webkit-transition: all 0.3s;-moz-transition: all 0.3s;-o-transition: all 0.3s;transition: all 0.3s;}ul.featured-widget-list li:hover .featured-meta{bottom:20px;opacity:1}.feat-buttons{position:absolute;top:50%;left:0;z-index:5;width:100%}
.feat-buttons a{text-indent:-9999px;margin:0 7px;width:15px;height:15px;padding:5px;background:#000;-ms-filter:"progid:DXImageTransform.Microsoft.Alpha(Opacity=60)";filter: alpha(opacity=60);-moz-opacity:0.6;-khtml-opacity:0.6;opacity:0.6;position:relative;-webkit-border-radius: 50%;-moz-border-radius: 50%;border-radius: 50%;}.feat-prev{float:left;}.feat-next{float:right;}.feat-buttons a.feat-prev::before, .feat-buttons a.feat-next::before{content:"";width:0;height:0;border-width:6px 7px;border-style:solid;border-color:transparent #fff transparent transparent;position:absolute;top:50%;margin-top:-6px;margin-left:-11px;left:50%}
.feat-buttons a.feat-next::before{border-color:transparent transparent transparent #fff;margin-left:-3px}
</style>
<div id="featuredbwidget"></div>
<link href='https://fonts.googleapis.com/css?family=Abel' rel='stylesheet' type='text/css'/>
<script src="http://ajax.googleapis.com/ajax/libs/jquery/1.8.0/jquery.min.js" type="text/javascript"></script>
<script type='text/javascript'>
//<![CDATA[
featuredbwidget({
listURL:"https://techloggerx.blogspot.com/",
featuredNum:9,
listbyLabel:false,
feathumbSize:350,
interval:3000,
autoplay:true,
featuredID:"#featuredbwidget"
});
function featuredbwidget(a){(function(e){var h={listURL:"",featuredNum:3,featuredID:"",feathumbSize:300,interval:5000,autoplay:false,loadingFeatured:"nextfeatured",pBlank:"https://blogger.googleusercontent.com/img/b/R29vZ2xl/AVvXsEj6f8hct8PoDSPG6sQnlvPCCP1fEOlqnrwgymlMxdRWiJQBe-NqrlOBYmIN_DoMAiaOf8HM84onvR46CO8jfewadJR4XxQ9RRfRqWUAv2oWqXfDVqFNCyJfxWbmosMqPKUe1JdTUvoAXXM/s500/no-image.png",byMonth:["Jan","Feb","Mar","Apr","May","Jun","Jul","Aug","Sep","Oct","Nov","Dec"],listbyLabel:false};h=e.extend({},h,a);var g=e(h.featuredID);var d=h.featuredNum*200;g.html('<div class="featslider"><ul class="featured-widget-list"></ul><div class="feat-buttons"><a href="#" class="feat-prev">Prev</a><a href="#" class="feat-next">Next</a></div></div>');var f=function(w){var q,k,m,u,x,p,t,v,r,l="",s=w.feed.entry;for(var o=0;o<s.length;o++){for(var n=0;n<s[o].link.length;n++){if(s[o].link[n].rel=="alternate"){q=s[o].link[n].href;break}}if("media$thumbnail" in s[o]){u=s[o].media$thumbnail.url.replace(/\/s[0-9]+\-c/g,"/s"+h.feathumbSize+"-c")}else{u=h.pBlank.replace(/\/s[0-9]+(\-c|\/)/,"/s"+h.feathumbSize+"$1")}k=s[o].title.$t;r=s[o].published.$t.substring(0,10);m=s[o].author[0].name.$t;x=r.substring(0,4);p=r.substring(5,7);t=r.substring(8,10);v=h.byMonth[parseInt(p,10)-1];l+='<li><a href="'+q+'"><div class="featuredbg"></div><img class="featuredthumb" src="'+u+'"/><h5>'+k+'</h5></a><div class="featured-meta"><span class="fdate"><span class="fday">'+t+'</span> <span class="fmonth">'+v+'</span> <span class="fyear">'+x+'</span></span> - <span class="fauthor">'+m+"</span></div></li>"}e("ul",g).append(l).addClass(h.loadingFeatured)};var c=function(){e(h.featuredID+" .feat-next").click()};var b=function(){e.get((h.listURL===""?window.location.protocol+"//"+window.location.host:h.listURL)+"/feeds/posts/summary"+(h.listbyLabel===false?"":"/-/"+h.listbyLabel)+"?max-results="+h.featuredNum+"&orderby=published&alt=json-in-script",f,"jsonp");setTimeout(function(){e(h.featuredID+" .feat-prev").click(function(){e(h.featuredID+" .featslider li:first").before(e(h.featuredID+" .featslider li:last"));return false});e(h.featuredID+" .feat-next").click(function(){e(h.featuredID+" .featslider li:last").after(e(h.featuredID+" .featslider li:first"));return false});if(h.autoplay){var i=h.interval;var j=setInterval(c,i);e(h.featuredID+" .featslider li:first").before(e(h.featuredID+" .featslider li:last"));e(h.featuredID+" .featslider").hover(function(){clearInterval(j)},function(){j=setInterval(c,i)})}e("ul",g).removeClass(h.loadingFeatured)},d)};e(document).ready(b)})(jQuery)};
//]]>
</script>

Automatic Featured Posts Slider Settings

listURL - replace "https://techloggerx.blogspot.com/" with your blog URL
featuredNum - add the number of posts to display in the slider
listbyLabel - if you want to display posts by category / label, such as the tag fashion, it will be written as listbyLabel: "fashion"
feathumbSize - the size or dimension of the image in pixels
interval - time taken to change the slides position in milliseconds
autoplay - replace true with false if you don't want the slides to change automatically.
3. Once you are done with the settings, click the 'Save' button.

Now, this code is for a slider widget which means that instead of just a random list of Featured Posts, you get to display them with images (if they have one) and you can include effects too. You can also control how many slides should be shown because it just wouldn't be prudent to feature your entire oeuvre, right?

Plus, being a slider widget, it adds a nice little visual to your site. And we all know how visuals are important in enticing people to stay, don't we? 

Saturday, April 16, 2016

Popup Email Subscription BoX For Blogger

Popup Email Subscription BoX For Blogger

Pop up Email Subscribe box for Blogger - is a blogger widget using jquery. This subscription form created with css3 and jquery. In this tutorial i shared how to add pop up email subscription box for your blogspot blog.
Popup Email Subscription BoX For Blogger Pink
By adding this widget, you should easily increase your blog readers. It's a better way for increase blog readers. I hope this fresh pop up email subscribe box help you to increase blog readers. Now lets start the tutorial.

Go to blogger dashboard > Template > Edit HTML and past the below CSS Code before  </style>

#sub-box {display:none;background:rgba(0,0,0,0.9);width:100%;height:100%;position:fixed;top:0;left:0;z-index:99999;}#boxclose {width:100%;height:100%;-webkit-transform:translateZ(0);}#boxview {background:#fff;border:8px solid #fff;width:400px;height:170px;position:absolute;top:35%;left:36%;}#closebox {float:right;cursor:pointer;position:absolute;right:-1px;top:-2px;}#closebox:before {content:"Close";padding:5px 8px;background:#fff;color:#f25d5c;font-weight:normal;font-size:12px;font-family:Open sans;}#boxlink,#boxlink a.visited,#boxlink a,#boxlink a:hover {color:#aaaaaa;font-size:9px;text-decoration:none;text-align:center;padding:5px;}#subscribe-box {width:400px;height:170px;background-color:#f25d5c;}#subscribe-box p {font-family:'Open Sans';font-size:18px;color:#fff;line-height:20px;padding:10px 20px 0 20px;margin:0;}#subscribe-box .emailfield {padding:0px 20px 10px;}#subscribe-box .emailfield input {background:#f9f9f9;color:#bbb;padding:10px;margin-top:10px;font-size:13px;font-family:'Open Sans';width:96.3%;border:0;transition:all 0.4s ease-in-out;}#subscribe-box .emailfield input:focus {background:#fff;outline:none;color:#888;}#subscribe-box .emailfield .submitbutton {background:#444;color:#fff;text-transform:uppercase;font-weight:normal;font-size: 16px;border:none;outline:none;width:100%;cursor:pointer;border-radius:3px;transition:all 0.4s ease-in-out;}#subscribe-box .emailfield .submitbutton:active {outline:none;border:none;background:#fff;color:#e25734;}#subscribe-box .emailfield .submitbutton:hover{background:#fff;color:#444;}


Now Save Template.
Now go to Layout > Add a gadget > HTML/Javascript and past the following below code.

<script type='text/javascript'>
//<![CDATA[
jQuery.cookie = function (key, value, options) {
// Pengaturan cookie
if (arguments.length > 1 && String(value) !== "[object Object]") {
options = jQuery.extend({}, options);
if (value === null || value === undefined) {
options.expires = -1;
}
if (typeof options.expires === 'number') {
var days = options.expires, t = options.expires = new Date();
t.setDate(t.getDate() + days);
}
value = String(value);
return (document.cookie = [
encodeURIComponent(key), '=',
options.raw ? value : encodeURIComponent(value),
options.expires ? '; expires=' + options.expires.toUTCString() : '', // use expires attribute, max-age is not supported by IE
options.path ? '; path=' + options.path : '',
options.domain ? '; domain=' + options.domain : '',
options.secure ? '; secure' : ''
].join(''));
}
// cookie
options = value || {};
var result, decode = options.raw ? function (s) { return s; } : decodeURIComponent;
return (result = new RegExp('(?:^|; )' + encodeURIComponent(key) + '=([^;]*)').exec(document.cookie)) ? decode(result[1]) : null;
};
//]]>
</script>
<script type='text/javascript'>
jQuery(document).ready(function($){
if($.cookie('popup_facebook_box') != 'yes'){
$('#sub-box').delay(3000).fadeIn('fast');
$('#closebox, #boxclose').click(function(){
$('#sub-box').stop().fadeOut('fast');
});
}

});
</script>
<div id='sub-box'>
<div id='boxclose'>
</div>
<div id='boxview'>
<div id='closebox'>
</div>
<div id='subscribe-box'>
<center>
<p>Subscribe To Get Daily Updates</p>
</center>
<div class='emailfield'>
<form action='http://feedburner.google.com/fb/a/mailverify?uri=YOUR-USER-NAME' method='post' onsubmit='window.open('http://feedburner.google.com/fb/a/mailverify?uri=YOUR-USER-NAME, 'popupwindow', 'scrollbars=yes,width=550,height=520');return true' target='popupwindow'>

<input type='text' name='email' onblur='if (this.value == "") {this.value = "Your Email";}' onfocus='if (this.value == "Your Email") {this.value = "";}' value='Your Email'/>
<input name='uri' type='hidden' value='YOUR-USER-NAME'/>
<input name='loc' type='hidden' value='en_US'/>
<input class='submitbutton' type='submit' value='Subscribe Now!'/>

</form>
</div>
</div>
</div>
</div>

Note: YOUR-USER-NAME replace with your feedburner user name.

That's it. Now refresh your page and see result. If you found any problem then inform me comment section and if you think our post is helpful then do not forget to share with others. Thanks...

Sunday, April 3, 2016

How To Add an Instagram Widget in a Blogger Blog

If you're not familiar with Instagram, it's a photo-sharing network that can be downloaded to your smart phone as an application. Think of it as Facebook without the status updates. By developing a simple service that does one thing, and does it well, Instagram has become one of the most prominent photo sharing apps on the market.

The great thing about using Instagram is that it's not just for individuals. Businesses and non-profits alike can take advantage of this service to share their day and passions with their dedicated customers and fans. These fans number nearly 200 million active users a month, and approximately 7.3 million new daily posts. That's an astonishing number of potential new customers available for you to capture.

SEE ALSO: Create A Rollover Image Effect (Change Image On Mouseover)


By adding Instagram on Blogger as a widget, you can unleash a new visual aspect of that site and allow visitors to go beyond just words on a page. With the convenience to carry the application around on your smartphone wherever you go, you can snap pictures, apply filters, and upload that content to your profile. From the profile, a widget specially designed for Instagram on Blogger would translate that data and display the image on your site. Even those visitors that aren't members of Instagram could benefit from such a service.

It doesn't matter what you are sharing. Whether you're the type of person that loves to share pictures of your dinner with the world, or business owner that loves showcasing their brand in everyday life, Instagram can work for you. Adding Instagram on Blogger as a widget also offers an incredibly accessible tool for stock photos to use in new posts.

This guide will explain how to add an Instagram widget to your site with step-by-step instructions. The design of your new Instagram widget is entirely customizable and will allow you to modify the background color, font, and how the widget is actually displayed on the site. When you're finished, you'll find that the Instagram widget will blend together effortlessly with your current theme and make your Blogger site truly stand out from the rest.

How to Add An Instagram Widget in Blogger

1. To get the Instagram widget, access the Intagme website here: Intagme

2. Type in your username > select Grid or Slideshow:

Instagram Widget For Blogger

3. Select the Thumbnail size of your images (100px is the default) and choose if you want a border around your Photos or not

Thumbnail Size and Photo Border

4. To change the Background Color, simply click on the empty box and pick your favorite color

Background Color and Sharing Buttons


5. If you want to show the Sharing buttons on your widget, select 'Yes', otherwise, click 'No'.

6. Once you're satisfied with the widget, press the "Get Code" button and copy your code.

Get Code

7. Log into your Blogger account and select your blog > navigate to Layout and click on the "Add a Gadget" link on the right side:


Add a Gadget
8. In the pop-up window, scroll down and click on the "HTML/JavaScript" gadget:


html/javascript
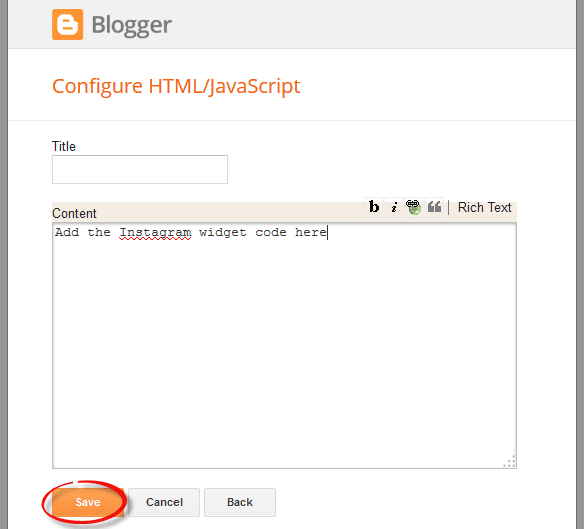
9. Paste the code that you got from the Instagme website into the content section and press the 'Save' button to save the widget. 

Add Instagram Widget Code

10. Click and drag your widget if you want to change its position and press the "Save Arrangement" button on the upper right side


Click and Drag

And that's it! Now you have your very own Instagram widget on your Blogger blog to share new photos with visitors, and provide just a glimpse of your life when you're away from the computer. To change or add any of the photos that are displayed in the widget, you'll have to go directly through the app itself, or log on to your account via Instagram's website.

SEE ALSO: How To Add Disqus Comment System On Blogger


Once you're ready to show off your new work, let all your customers or fans know by posting a Facebook link to the site or a tweet about the changes and asking them to follow you. Just make sure that you've added a few photos before making the announcement, so that they have something to look at. After they access your widget, they can like your new photos and interact with you in entirely new ways.


5 Best Popular Posts Widgets for Blogger

If you're using Blogger as the platform for your personal or business blog, you're probably looking for ways to customize it and make it your own. This way, you'll make your webpages unique and eye-catching and ensure they'll stand out from the many other pages on the internet. You'll also grab the attention of your target market, encourage them to browse through your blog and become your loyal readers and followers.


SEE ALSO: Create A Rollover Image Effect (change image on mouseover)


Fortunately, there are lots of ways to personalize your Blogger blog, and one of these is to customize your Popular Posts widget. Haven't installed this yet? Don't worry since putting it in your blog easy.


Adding the Popular Posts Widget for Blogger

Just click on your blog title, access the Layout menu, click "Add Widget" and choose "Popular Posts". A window will appear asking you to configure the widget by choosing which posts you'll feature (e.g. those that were most viewed in the past 7 days or 30 days or from the beginning of your blog). You'll also be asked to choose how many posts you'll feature in your Popular Posts section and select if you'll show the post title only or along with the image thumbnail and/or the snippet. (Remember that each widget style has different requirements, so follow the instructions carefully to know if you'll need the snippet and image thumbnail or not).


Popular Posts Configure 5 best popular posts widget
Configure Popular Posts

Once you've followed these instructions, you'll get to see the basic version of the Popular Posts Widget for Blogger in your blog. You can stick with this if it matches your blog design but, if it sticks out like a sore thumb or doesn't suit your taste, there's no need to fret since you can personalize it.

Popular Posts Style 1 - Box within a box

This is an interesting widget style since it uses your snippet and image thumbnail in a unique way. Your snippet is written in opaque text and placed in a small transparent box. This, in turn, is placed in a bigger rectangular box, wherein your image thumbnail is used as a background. Choosing this Popular Posts Widget for Blogger can be a great option if you want to brighten up your blog and grab the attention of readers with your colorful photos.


Popular posts widget, popular posts style
Popular Posts Style 1


<style type='text/css'>
.sidebar .PopularPosts ul {
margin: 0;
padding: 0;
}
.sidebar .PopularPosts ul li {
list-style: none !important;
padding: 0 !important;
margin-bottom: 10px;
}
.sidebar .PopularPosts .item-thumbnail {
height: 190px;
margin: 0;
overflow: hidden;
width: 100%;
}
.sidebar .PopularPosts .item-title {
position: relative;
}
.sidebar .PopularPosts img {
height: 100%;
width: 100%;
object-fit: cover;
}
.sidebar .PopularPosts .item-title a {
color: #FFFFFF;
font: 15px &#39;Oswald&#39;, sans-serif;
text-transform: uppercase;
font-size: 20px;
padding: 10px;
position: absolute;
right: 0;
left: 0px;
margin: 0px auto;
text-align: center;
text-decoration: none;
top: 40px;
width: 60%;
height: 26px;
overflow: hidden;
z-index: 2;
}
.sidebar .PopularPosts .item-snippet {
background: rgba(0, 0, 0, 0.35);
border-top: 6px solid rgba(0, 0, 0, 0.1);
border-bottom: 6px solid rgba(0, 0, 0, 0.1);
color: #FFFFFF;
left: 0px;
right: 0px;
margin: 0px auto;
padding: 65px 10px 10px;
position: absolute;
font: 13px &quot;Times New Roman&quot;,Times,FreeSerif,serif;
text-align: center;
top: 35px;
width: 60%;
z-index: 1;
}
.sidebar .PopularPosts .item-content {
position: relative;
}
</style>


 Popular Posts Style 2 - Large thumbnails with small post titles underneath

This uses the same code as the basic Blogger Popular Posts Widget with a few tweaks. Popularized by well-known blogs, this style is eye-catching because it focuses on pictures, which don't only summarize the posts' content but also add visual drama to the entire page. This is particularly useful for blogs that focus on clothes, makeup, art and other topics that highly depend on visual presentation to better express ideas.

Popular Posts Style Popular Posts widgets blogger
Popular Posts Style 2


<style type='text/css'>
.sidebar .PopularPosts ul {
counter-reset: popularcount;
margin: 0;
padding: 0;
}
.sidebar .PopularPosts ul li {
width: 100%;
list-style: none !important;
padding: 0 !important;
margin-bottom: 20px;
position: relative;
border: 0;
}
.sidebar .PopularPosts .item-thumbnail a {
clip: auto;
display: block;
height: auto;
height: 120px;
}
.sidebar .PopularPosts .item-thumbnail {
width: 100%;
position: relative;
margin-bottom: 15px;
}
.sidebar .PopularPosts .item-thumbnail::before {
background: rgba(0, 0, 0, 0) none repeat scroll 0 0;
border-bottom: 29px solid #fff;
border-left: 29px solid transparent;
border-right: 29px solid transparent;
bottom: 0px;
content: &quot;&quot;;
height: 0;
width: 0px;
left: 0px;
right: 0px;
margin-left: auto;
margin-right: auto;
position: absolute;
z-index: 3;
}
.sidebar .PopularPosts .item-thumbnail:after {
color: #000;
content: counter(popularcount, decimal);
counter-increment: popularcount;
font: 13px &quot;Times New Roman&quot;,Times,FreeSerif,serif;
list-style-type: none;
position: absolute;
bottom: 0;
text-align: center;
margin: 0px auto;
left: 0px;
right: 0px;
z-index: 4;
}
.sidebar .PopularPosts .item-thumbnail img {
position: relative;
width: 100%;
height: 120px;
object-fit: cover;
}
.sidebar .PopularPosts .item-title {
font: 15px &#39;Oswald&#39;, sans-serif;
text-transform: uppercase;
text-align: center;
margin: 0px auto;
padding-bottom: 10px;
border-bottom: 1px solid #000;
}
.sidebar .PopularPosts .item-title a {
color: #000;
text-decoration: none;
}
.sidebar .PopularPosts .item-snippet {
padding: 10px 15px;
font: 13px &quot;Times New Roman&quot;,Times,FreeSerif,serif;
text-align: center;
}
</style>


 Popular Posts Style 3 - Colorful boxes

If your blog needs a pop of color, this is the right choice for you. This widget style presents your Popular Posts in several boxes that feature a thumbnail image and have bright, eye-catching shades like light green, ocher yellow and vivid orange. Each box has a different color, and you can add up to four boxes.

Popular Posts Style Popular Posts widgets blogger
Popular Posts Style - 3

<style type='text/css'>
.sidebar .PopularPosts ul {
padding: 0;
margin: 0;
}
.sidebar .PopularPosts .item-thumbnail a {
clip: auto;
display: block;
height: auto;
overflow: hidden;
}
.sidebar .PopularPosts .item-thumbnail {
width: 130px;
height: 130px;
border-right: 5px solid #fff;
margin: 0px 10px 0px 0px !important;
position: relative;
}
.sidebar .PopularPosts .item-thumbnail img {
position: relative;
height: 100%;
width: 100%;
object-fit: cover;
}
.sidebar .PopularPosts ul li {
float: left;
margin-bottom: 5px;
max-height: 130px;
min-width: 250px;
overflow: hidden;
}
.sidebar .PopularPosts ul li:first-child {
background: #D9EDF7;
}
.sidebar .PopularPosts ul li:first-child + li{
background: #F2DEDE;
}
.sidebar .PopularPosts ul li:first-child + li + li {
background: #DFF0D8;
}
.sidebar .PopularPosts ul li:first-child + li + li + li {
background: #FFEEBC;
}
.sidebar .PopularPosts ul li:first-child + li + li + li + li{
background: #E0E0E0;
}
.sidebar .PopularPosts .item-title {
font: 13px &#39;Oswald&#39;, sans-serif;
text-transform: uppercase;
padding: 10px 5px 10px;
}
.sidebar .PopularPosts .item-title a {
color: #000;
text-decoration: none;
}
.sidebar .PopularPosts .item-snippet {
font: 13px &quot;Times New Roman&quot;,Times,FreeSerif,serif;
padding-right: 5px;
}
.sidebar .PopularPosts .widget-content ul li {
padding: 0px 5px 0px 0px!important;
}
</style>

 Popular Posts Style 4 - Grid layout

Just like the large-picture widget style, the grid layout is an excellent option if you want to showcase your pictures or if your blog depends on visual information. However, the title of your posts won't be included in the layout, so readers will have to hover their mouses on the images to read the titles.

Popular Posts Style - 4


<style type='text/css'>
.sidebar .PopularPosts ul {
padding: 0;
}
.sidebar .PopularPosts ul li:first-child{
width: 100%;
max-height: 100%;
opacity: 0.9;
}
.sidebar .PopularPosts ul li:nth-child(even){
margin-right: 2%;
}
.sidebar .PopularPosts ul li {
box-sizing: border-box;
position: relative;
padding: 0px !important;
width: 49%;
max-height: 120px;
opacity: 0.4;
overflow:hidden;
float: left;
margin-bottom: 2%;
-webkit-transition: all 0.5s ease 0s;
-moz-transition: all 0.5s ease 0s;
-ms-transition: all 0.5s ease 0s;
-o-transition: all 0.5s ease 0s;
transition: all 0.5s ease 0s;
}
.sidebar .PopularPosts ul li:hover {
opacity: 1;
}
.sidebar .PopularPosts .item-thumbnail {
margin: 0;
width: 100%;
}
.sidebar .PopularPosts ul li img {
box-sizing: border-box;
width: 100%;
height: 100%;
object-fit: cover;
padding:0;
}
.sidebar .PopularPosts .item-content:hover .item-title a,
.sidebar .PopularPosts .item-thumbnail-only:hover .item-title a {
visibility: visible;
opacity: 1;
}
.sidebar .PopularPosts .item-title a {
color: #fff;
background: rgba(0, 0, 0, 0) linear-gradient(to bottom, rgba(0, 0, 0, 0) 0%, rgba(0, 0, 0, 0.93) 100%, rgba(0, 0, 0, 0.85) 100%);
text-decoration: none;
position: absolute;
text-align: center;
font: 13px &#39;Oswald&#39;, sans-serif;
left: 0;
right: 0;
bottom: 0%;
padding: 100px 10px 10px;
opacity: 0;
visibility: hidden;
}
.sidebar .PopularPosts .item-snippet {
display: none;
}
</style>


Popular Posts Style 5 - Numbered posts

If you love numbered lists, or if you'd like to make your blog more organized, this can be the perfect option. By using the code for this widget style, your Popular Posts will be automatically numbered and will feature clean, minimalistic boxes that include your snippet and image thumbnail.

Popular Posts Style - 5

<style type='text/css'>
.sidebar .PopularPosts ul {
counter-reset: popularcount;
margin: 0;
padding: 0;
}
.sidebar .PopularPosts ul li {
float: left;
max-height: 130px;
min-width: 250px;
position: relative;
}
.sidebar .PopularPosts .item-thumbnail::after {
color: rgba(255,255,255, 0.63);
content: counter(popularcount, decimal);
counter-increment: popularcount;
font: 70px &#39;Oswald&#39;, sans-serif;
list-style-type: none;
position: absolute;
left: 5px;
top: -5px;
z-index: 4;
}
.sidebar .PopularPosts .item-thumbnail::before {
background: rgba(0, 0, 0, 0.3);
bottom: 0px;
content: &quot;&quot;;
height: 100px;
width: 100px;
left: 0px;
right: 0px;
margin: 0px auto;
position: absolute;
z-index: 3;
}
.sidebar .PopularPosts .item-thumbnail a {
clip: auto;
display: block;
height: auto;
overflow: hidden;
}
.sidebar .PopularPosts .item-thumbnail {
width: 100px;
height: 100px;
margin: 0px 10px 0px 0px !important;
position: relative;
}
.sidebar .PopularPosts .item-thumbnail:hover:before {
display: none;
}
.sidebar .PopularPosts .item-thumbnail img {
position: relative;
padding-right: 0px !important;
height: 100%;
width: 100%;
object-fit: cover;
}
.sidebar .PopularPosts .item-title {
font: 13px &#39;Oswald&#39;, sans-serif;
text-transform: uppercase;
padding: 0px 5px 10px;
}
.sidebar .PopularPosts .item-title a {
color: #000;
text-decoration: none;
}
.sidebar .PopularPosts .item-snippet {
font: 13px &quot;Times New Roman&quot;,Times,FreeSerif,serif;
}
.sidebar .PopularPosts .widget-content ul li {
padding: 0px 5px 0px 0px !important;
}
.sidebar .PopularPosts .item-content {
padding: 5px 0px;
border-bottom: 1px dotted #dedede;
overflow: hidden;
height: 100px;
position: relative;
}
</style>

These are just some of the widget styles you can choose from. When you've picked a style you want, make sure to copy its CSS code. Once you do so, go to your blog, click "Template" on the left side and select "Edit HTML" under the template preview.


SEE ALSO: How To Display Most Commented Posts In Blogger


These next codes need to be pasted above the "</body> " or "</head>" tags, so check the instruction to know exactly where you need to put the code.

Adding the CSS

When the template editor has opened, click anywhere inside the code area and hit CTRL + F or Command F to search the following tag:


<head>

Just ABOVE the </head> tag, copy-paste the CSS code of one of the styles above.


Important: If the Popular Posts widget is located in the footer of your blog, remove the .sidebar class found in the CSS code in order to make it work.

Please note that most of the styles are using the Oswald font which you need to add to your template's code as well.

So, search for this tag:


<head>


Just BELOW it, add this line:


<link href='https://fonts.googleapis.com/css?family=Oswald:400,700' rel='stylesheet' type='text/css'/>

Adding the JavaScript

These styles also require JavaScript codes in order to resize the popular posts image / thumbnail and trim the post snippet and title. To add the JavaScript, search the </body> tag and paste the following script just above it:


<script src='//ajax.googleapis.com/ajax/libs/jquery/1.11.1/jquery.min.js'/>
<script type='text/javascript'>
$(&#39;.popular-posts img&#39;).attr(&#39;src&#39;, function(e, t) {
return t.replace(&#39;/s72-c/&#39;, &#39;/s350-c/&#39;)
});
$(&#39;.popular-posts ul li .item-snippet&#39;).each(function(){
var txt=$(this).text().substr(0,60);
var j=txt.lastIndexOf(&#39; &#39;);
if(j&gt;10)
$(this).text(txt.substr(0,j).replace(/[?,!\.-:;]*$/,&#39;...&#39;));
});
$(&#39;.popular-posts ul li .item-content a&#39;).each(function(){
var txt=$(this).text().substr(0,60);
var j=txt.lastIndexOf(&#39; &#39;);
if(j&gt;=6)
$(this).text(txt.substr(0,j).replace(/[?,!\.-:;]*$/,&#39;...&#39;));
});
</script>

 Note: if you have already the jQuery library in your template, remove the line in red.

SEE ALSO: Add 6 Stylish Custom Search Boxes To Blogger


Once you have added all the codes in the right place, press the "Save template" button to save the changes.

That's it!

The five Popular Posts widgets for Blogger featured today are all great solutions for adding a popular post section to your blog. They all have different appearance for determining what makes a post popular, but the end result is the same: visitors are always one click away from your best content. Try some of these styles, find your favorite, and see how it impacts the performance of your blog.